I observed many times infopath webbased form not print full form contents. it's only print Firstpage of the form remaining pages print blank e.g if my webbased form has 4 pages if i print this form browser based file\print\ button, it print only first page remaining 2,3,4, pages print blank but here it print header and footer, but i does not print full webpart contents.
so i decided to work on this topic
Insert a Content Editor Web Part and edit the source code. Add the following to it:
<input type="button" OnClick="javascript:void(PrintWebPart())" value="Print Web Part">
<script language="JavaScript">
//Controls which Web Part or zone to print
var WebPartElementID = "<WebPartElementID>";
//Function to print Web Part
function PrintWebPart()
{
var bolWebPartFound = false;
if (document.getElementById != null)
{
//Create html to print in new window
var PrintingHTML = '<HTML>\n<HEAD>\n';
//Take data from Head Tag
if (document.getElementsByTagName != null)
{
var HeadData= document.getElementsByTagName("HEAD");
if (HeadData.length > 0)
PrintingHTML += HeadData[0].innerHTML;
}
PrintingHTML += '\n</HEAD>\n<BODY>\n';
var WebPartData = document.getElementById(WebPartElementID);
if (WebPartData != null)
{
PrintingHTML += WebPartData.innerHTML;
bolWebPartFound = true;
}
else
{
bolWebPartFound = false;
alert ('Cannot Find Web Part');
}
}
PrintingHTML += '\n</BODY>\n</HTML>';
//Open new window to print
if (bolWebPartFound)
{
var PrintingWindow = window.open("","PrintWebPart", "toolbar,width=800,height=600,scrollbars,resizable,menubar");
PrintingWindow.document.open();
PrintingWindow.document.write(PrintingHTML);
// Open Print Window
PrintingWindow.print();
}
}
< /script>
Once you have done the above, you need to find the web part id of the web part you want to print when this button is clicked.
To do that, you view the source of the page and look for the web part title corresponding to the web part. It looks something like this:
<div WebPartID="0e77b913-99e6-402c-8558-cdd5a2100eb2" HasPers="false" id="WebPartctl00_m_g_0e77b913_99e6_402c_8558_cdd5a2100eb2" width="100%" class="ms-WPBody" allowDelete="false" style="" >
The id that you're interested in to replace <WebPartElementID> in the javascript above is highlighted.
Once it's all there, click on the button and a window will pop open that contains only the contents of the web part. Feel free to print.
Saturday, August 4, 2012

Friday, July 13, 2012
InfoPath 2010: Pre-populate the People Picker
|
|
This solution can be done with any version of
SharePoint 2010 or SharePoint Online with Office 365.
Here’s a little bit of background on how the people picker is structured:  It is structured as a repeating table, and the “group” can be renamed. No other fields can be renamed • DisplayName = Nizamuddin This is the first name and last name of the user, which is going to be equivalent to the value of the PreferredName field in the user profile service. • AccountId = contoso\Nizamuddin This is domain\username • AccountType = User This is User or Group.  Here are the steps to prepopulate the people picker:
|


![CropperCapture[38]](http://sharepoint911.com/blogs/laura/Lists/Posts/Attachments/178/CropperCapture38_2_3A49519C.png "CropperCapture[38]")
![CropperCapture[40]](http://sharepoint911.com/blogs/laura/Lists/Posts/Attachments/178/CropperCapture40_2_3A49519C.png "CropperCapture[40]")
![CropperCapture[41]](http://sharepoint911.com/blogs/laura/Lists/Posts/Attachments/178/CropperCapture41_2_3A49519C.png "CropperCapture[41]")
![CropperCapture[42]](http://sharepoint911.com/blogs/laura/Lists/Posts/Attachments/178/CropperCapture42_2_3A49519C.png "CropperCapture[42]")
![CropperCapture[43]](http://sharepoint911.com/blogs/laura/Lists/Posts/Attachments/178/CropperCapture43_2_3A49519C.png "CropperCapture[43]")
![CropperCapture[44]](http://sharepoint911.com/blogs/laura/Lists/Posts/Attachments/178/CropperCapture44_2_2557CF29.png "CropperCapture[44]")
![CropperCapture[45]](http://sharepoint911.com/blogs/laura/Lists/Posts/Attachments/178/CropperCapture45_2_2557CF29.png "CropperCapture[45]")
![CropperCapture[46]](http://sharepoint911.com/blogs/laura/Lists/Posts/Attachments/178/CropperCapture46_2_2557CF29.png "CropperCapture[46]")
Thursday, April 26, 2012
enable Audit functionality in SharePoint 2010
How to enable Audit functionality in SharePoint 2010
“Microsoft SharePoint Server 2010 includes four information management
policy features to help you manage your content: expiration, auditing, document
labels, and document bar codes. - msdn.microsoft.com”.
In this post I will focus on the audit capabilities in SharePoint 2010, more specifically how to enable the audit functionality.
When the audit functionally is enabled it will automatically log events and activities that is done on your content. The content could be documents, records and other items, such as task list and calendars.
What’s available for the administrator? The audit functionality can be enabled on different levels in SharePoint’s containment hierarchy. Specifically, you can enable auditing on these levels: site collection, library/list, folder, and content type.
Site Collection
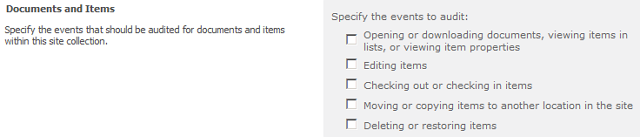
On the same page you also have the option to enable audit logging for Lists, Libraries and Sites:

Library/list

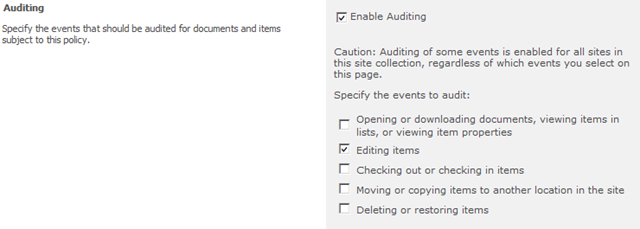
Hey, wait a minute! This is not enabling auditing of all documents in this library.
True. It is more about being able to apply different events to audit, to different libraries, even when those libraries are using the same content types. Which leads us to how to apply auditing on the content type.
Content Type
 Click on Enable Auditing and then select the events you
would like to be written to the audit log.
Click on Enable Auditing and then select the events you
would like to be written to the audit log.
Hmmm…. what happens if I have applied auditing on a content type, and now are trying to apply different rules at the library level?
Following the example above, I have enabled the “Edit items” events on the Content Type level. Going back to my library and into my library settings I find that I can’t apply specific policy settings because the library inherits the settings from the Content Type:
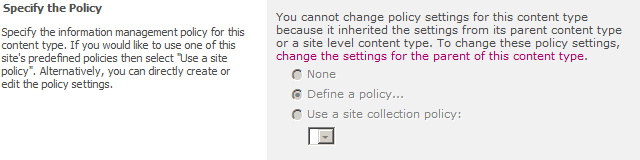
So, if you need to differentiate audit settings between libraries you cannot configure audit settings on the Content Type level.
Folder
A folder (in a library) is just another content type. See details above on how to configure auditing on content types.
By enabling auditing in a SharePoint environment with a large number of events, you will potentially end up with a large audit log which can affect the over all performance. It is recommended to enable audit log trimming for site collections with extensive auditing.
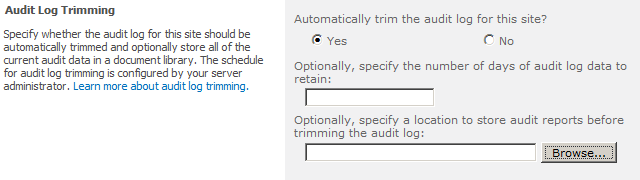
As you can see, the number of days of audit log data to retain is an optional field. If you don’t set this value the trimming will follow settings on the Farm level. This is done by the Farm Administrator using Central Admin.
Limit the size of the audit log
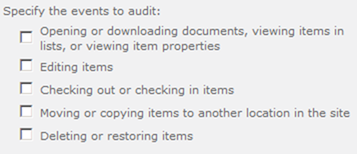
Only audit the events required to meet your needs. Which one of these events do you really need to log?
I recommend you to check out this page for details: http://office.microsoft.com/en-us/sharepoint-server-help/view-audit-log-reports-HA102039795.aspx
In this post I will focus on the audit capabilities in SharePoint 2010, more specifically how to enable the audit functionality.
When the audit functionally is enabled it will automatically log events and activities that is done on your content. The content could be documents, records and other items, such as task list and calendars.
Why
Why would you enable auditing in SharePoint? There could be different reasons, and they often depend on which vertical (e.g. Public/Government) you are located in.- Meet Regulatory and Legal requirements.
- Track how documents (and items) are used.
- Keep track of document history if documents are sent to the Content Organizer. When using the Content Organizer, the document’s version history is deleted. The audit log will be your source to the document history.
How
An Administrator has access to configure auditing, but a developer can also create custom code that read and write to the audit log. More details here: http://msdn.microsoft.com/en-us/library/ms441917.aspx.What’s available for the administrator? The audit functionality can be enabled on different levels in SharePoint’s containment hierarchy. Specifically, you can enable auditing on these levels: site collection, library/list, folder, and content type.
Site Collection
- Go to Site Actions –> Site Settings –> Site Collection Administration –> Site Collection audit settings.
- Under the Document and Items section you can enable the events you would like to audit:

On the same page you also have the option to enable audit logging for Lists, Libraries and Sites:

Library/list
- Go to [yourlibrary] –> Library Tools/Library –> Library Settings –> Permissions and Management –> Information management policy settings.
- Under the Content Types Policies section you can define a new policy or choose an existing policy (created in the site collection).

- More about how to create site collection policies later… In this example a choose “Define a policy…”
- Scroll down to Auditing where you will be able to choose the events you want to add to the audit log:

Hey, wait a minute! This is not enabling auditing of all documents in this library.
True. It is more about being able to apply different events to audit, to different libraries, even when those libraries are using the same content types. Which leads us to how to apply auditing on the content type.
Content Type
- Go to Site Actions –> Site Settings –> Galleries –> Site Content Type.
- Scroll down to Document Content Types and click on Document.
- Under Settings click on Information management policy settings:
 Click on Enable Auditing and then select the events you
would like to be written to the audit log.
Click on Enable Auditing and then select the events you
would like to be written to the audit log.Hmmm…. what happens if I have applied auditing on a content type, and now are trying to apply different rules at the library level?
Following the example above, I have enabled the “Edit items” events on the Content Type level. Going back to my library and into my library settings I find that I can’t apply specific policy settings because the library inherits the settings from the Content Type:

So, if you need to differentiate audit settings between libraries you cannot configure audit settings on the Content Type level.
Folder
A folder (in a library) is just another content type. See details above on how to configure auditing on content types.
Site Collection policies
You can predefine information management policies, and make them available for use within your site collection- Go to Site Actions –> Site Settings –> Site Collection Administration –> Site Collection policies.
- Click Create.
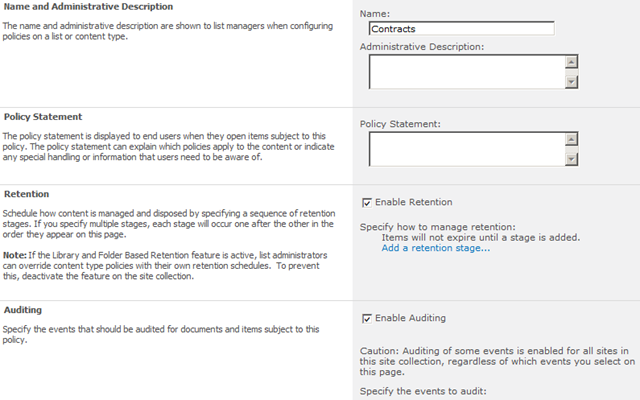
- A new page will let you predefine policies that also include more than the auditing. E.g you can create a policy for your Contracts that include both audit and retention settings. Having the policy predefined may make it easier for administrators to apply the correct policy to their content types.

Other things to consider…
Audit log trimmingBy enabling auditing in a SharePoint environment with a large number of events, you will potentially end up with a large audit log which can affect the over all performance. It is recommended to enable audit log trimming for site collections with extensive auditing.
- Go to Site Actions –> Site Settings –> Site Collection Administration –> Site Collection audit settings.

As you can see, the number of days of audit log data to retain is an optional field. If you don’t set this value the trimming will follow settings on the Farm level. This is done by the Farm Administrator using Central Admin.
Limit the size of the audit log
Only audit the events required to meet your needs. Which one of these events do you really need to log?

Audit log reports
Ok, I have enabled auditing.. how do I access my audit log?I recommend you to check out this page for details: http://office.microsoft.com/en-us/sharepoint-server-help/view-audit-log-reports-HA102039795.aspx
Resources
| Configure audit settings for site collection | http://office.microsoft.com/en-us/sharepoint-server-help/configure-audit-settings-for-a-site-collection-HA010099726.aspx |
| Version history erased when using Content Organizer | http://technet.microsoft.com/en-us/library/ff453933.aspx#Auditing |
| SPAudit Class | http://msdn.microsoft.com/en-us/library/ms441917.aspx |
| View audit log reports | http://office.microsoft.com/en-us/sharepoint-server-help/view-audit-log-reports-HA102039795.aspx |
Tuesday, March 27, 2012
Control Formatting of SharePoint Announcements
Here are the steps:
- Create an "Announcements" list, if there isn't already one on your
site.
- Create a list called "Create Announcements", using the list template "custom
list".
- Create the following columns in the Create Announcements list:
Green Header - Single line of text
Brown Header - Single line of text
Body - Multiple lines of text - Enhanced rich text
Photo URL - Hyperlink
Expiration - Date/Time
Then, I renamed "Title" to "Black Title" - In the Announcements list, a template must be created. Create a new
announcement. Make up a title, and then put the cursor in the body of the
announcement. Since I want to show the speaker's photo to the left of the
session description, I create a table. On the Insert tab, insert a table that's
got one row and two columns.
- In the left cell of the table, type "Picture", as a placeholder. In the
right cell, type the following:
- Now it's time to apply the colors. Select the text, and apply your desired
colors to each line, as so:
- Click Save.
- Open that same announcement back up, click to edit it, and put the cursor in
the Body field. Open the HTML source code, like this:
- Copy the HTML code to the clipboard. Open SharePoint Designer.
- Create a new workflow based on the Create Announcements list. Name it "New
Announcement".
- Add an action to set a workflow variable. (In SharePoint
2007, the action is called Store Dynamic String) Call the variable BodyTextVar,
and it is a string variable.
- Click the blue word Value. Click the little
ellipsis next to it (the button with 3 dots). Paste the contents of the
clipboard, which is the HTML source code. Mine looks like this
<div class="ExternalClassF2152D91E5604C86AA56CB2DF7047264"><table width="100%" class="ms-rteTable-default" border="0" cellspacing="0"><tbody><tr><td>Picture</td><td><p style="color: #000; font-size: 18pt"><strong>Black Title</strong></p><p style="color: green; font-size: 12pt">Green Header</p><p style="color: #8f6c2e; font-size: 10pt"><strong>Brown Header</strong></p><p>Body</p></td></tr></tbody></table></div> - In the spot of the code where you see the word "Picture", that needs to be
changed to HTML code for a picture. The Photo URL field will be used. Basically,
each placeholder in the code will be replaced with the name of the actual field
from the list, like this:
- Note that when you insert the Body field, be sure and
change Return field as: Plain Text.
- When you insert the Photo URL field, be sure to select
Return field as: URL
- I used the <Add or Change Lookup> button in the code,
to insert where the fields need to go. For example, I replaced Green Header with
the actual field called Green Header. Click OK.
- In the workflow, add the action Create List
Item.
- Click the blue words This
List, and pick Announcements.
- Set the Title field to the current list's Black Title, and
click the Add button. Add the body field, like this, and click
OK twice.
- One more field. Click the Add button. Choose "Expires" and
match it to the current list's "Expiration". The Create new list item action
will then look like this. Click OK.
- Publish the workflow. Note that since we didn't change the
workflow initiation (Start) settings, it is only set up to be triggered
manually, which is fine for testing.
- Before you create an item in the Create Announcements list, be sure to get
the URL of a photo that's in a library in SharePoint, to paste into the Photo
URL field. Create a new item in the Create Announcements list, and fill in all
the fields. Run the workflow.
- You'll notice that your new announcement gets created. Lovely! Any tweaking
that needs to be done regarding formatting and alignment needs to be done in the
HTML code that's in the first action "set variable" in the
workflow.
- Another enhancement: You may want users to be able to create items in Create
Announcements but not create or edit items in the actual announcements list.
This can be done. In the workflow, insert an Impersonation Step, and put those 2
steps inside of it. That way, you can take away the users permissions to
contribute to the announcements list, and the workflow will still be able to
create items in it, because it runs with the credentials of you, the person who
published the workflow.
- The web part view: In the Announcements list, create a new view. Make it a
Standard view, and call it Web Part. Only check the box next to the
Body column. Set the filter so that Expires is
greater than or equal to [Today]. Uncheck the box next to Tabular
View.
- On the home page of your site. Go to the web part toolpane of the Announcements web part. Change the view to this new Web Part view that you just created. Click OK. What is this for? Now, your announcements will be fully displayed on the home page without being cut off, and since we inserted the title field into the body of the announcement, only the body field needs to be shown.


display a “More” link on your announcements web part
Here is how to display a “More” link on your announcements web part, so that
users will have an obvious link to click on, to read more of each announcement.
- Create a new column in your announcements list called “More”, with a field type of “Hyperlink or Picture”
- In SharePoint Designer, create a new workflow - Open SharePoint Designer, and click <File> and <Open Site>
- Put in the URL of the site where you’d like to create the workflow, and open it.
- Click <File>, then <New>, then <Workflow>
- Pick your Announcements list from the drop-down list. Only check the box “Automatically start this workflow when a new item is created”.
- This workflow will have no condition.
Action: Build Dynamic String
Click on dynamic string, which will take you to the String Builder dialogue box. Type a backslash, then click the <Add Lookup> button.

Pick the Path field, and click OK, then type the rest of the string as so:

(The reason for the comma and “Click Here” is so that users aren’t presented with a big long URL to click, but some nice, short text)
Give the variable a name such as AnnouncementURL - Next Action: Set Field in Current Item -
Set the More field to … click the function button.

In the Source drop-down box, choose “Workflow Data”, and for the field, choose the variable that you called “AnnouncementURL” in step 6 above.

- Now, in the announcements web part on your site, edit the web part properties, edit the current view, and add the new “More” field to the view.
- You can even hide this new field, so it doesn’t display on your announcement forms. In the announcements list settings, go to Advanced settings. Change the setting “Allow management of content types” to Yes.
- Now, there’s a new section in your list’s settings called Content Types that contains one content type called “Announcement”.
- Click on the Announcement content type, click on the More field, and change it to Hidden. This will still allow the column to be added to any view, but the field will be hidden when opening or editing the announcement itself.
Note: If there is already a workflow running when a new item is created in this list, such as the one created in the first section of this article, I recommend adding this as a new step in the same “Create Announcement” workflow, as opposed to having two different workflows running when each item is created in the list.
Create a alert based Annoucements
Here’s how to use a single announcements list, categorize the announcements
by department, and allow alerts to be created per category. This list can also
be set up to display only the announcements of the logged in user’s specific
department.
Try it out. On the announcements list, click <Actions> and choose <Alert me>. You’ll notice that in the “Send Alerts for These Changes” section, there’s a new option that lets you choose to be alerted on items that exist in a particular view.

In this case, it’s a particular department’s announcements. Also, as an administrator, since you have the ability to set up alerts for other people, you can create a new alert based on new items created in the view for each department, and have that alert sent to members of a departmental group in Active Directory.
- In your announcements list, create a new column called “Department”, as a text box, choice list, or even a lookup to a separate list of departments.
- In the list, create a new, filtered view for each different department, like
this:
Click the View drop-down box at the top right of the announcements list, and choose “Create View”, choose Standard View.
In the Filter section, choose to filter by Department is equal to department name.
Do a new view for each department. - Now that the filtered views exist, alerts can be set up based on them.
Try it out. On the announcements list, click <Actions> and choose <Alert me>. You’ll notice that in the “Send Alerts for These Changes” section, there’s a new option that lets you choose to be alerted on items that exist in a particular view.
In this case, it’s a particular department’s announcements. Also, as an administrator, since you have the ability to set up alerts for other people, you can create a new alert based on new items created in the view for each department, and have that alert sent to members of a departmental group in Active Directory.
Publish Date functionality for Announcements
The ideas for this set of articles comes from user questions on Stump the
Panel regarding customizations and optimizations to announcements lists on
SharePoint sites. I will cover the following customizations:
Here’s how to create a publish date for each of your announcements, where the announcement will automatically be “published” when the date arrives.
Here’s what your workflow screen will look like:

We used “is less than or equal to Today” as the condition (instead of is equal to today) because it’s possible that a user could enter in a past date as the publish date. A condition is not needed in the second branch because it knows that if the condition in the first branch is not met, then otherwise do this.
- Create a Publish Date feature for announcements
- Create alerts based on announcement categories
- Modify the default “Current View” of the announcements Web Parts
- Create a “More” link to view the details of each announcement
Create a Publish Date functionality for Announcements
Here’s how to create a publish date for each of your announcements, where the announcement will automatically be “published” when the date arrives.
- Turn on content approval on your announcements list like this:
In the list’s settings, go to Versioning settings.
Change “Require content approval for submitted items?” to Yes
- Create a new Date and Time column in your announcements list called “Publish Date”, and make it a required column. You can even make it default to today’s date if you’d like.
- In SharePoint Designer, create a workflow like this: Open SharePoint
Designer, and click <File> and <Open Site>. Paste in the URL of the
site where you’d like to create the workflow, and open it. Click <File>,
then <New…>, then <Workflow…>

- Name this workflow “Create Announcement”
- Pick your Announcements list from the drop-down list. Only check the box “Automatically start this workflow when a new item is created”.
- Add the first condition to “Compare Announcements field”. If the field
Publish Date is less than or equal to (then, click on value, and choose
the little parameter builder button)

- In the Actions section, choose Set Content Approval Status. Set content approval status to “Approved”, and add comments such as “item automatically approved on publish date”
- But, if the announcement is supposed to be published on a future date, we
need the workflow to wait. Click to Add ‘Else If’ Conditional Branch. In the
new branch’s Action section, choose Pause Until Date. Click on this
time, and click the function button to display the data binding menu

With the Source as Current Item, choose Publish Date as the field. Click OK.
- The second action will be the same as the action on the previous
branch.
Set content approval status to “Approved”, and add comments such as “item automatically approved on publish date”
Here’s what your workflow screen will look like:
We used “is less than or equal to Today” as the condition (instead of is equal to today) because it’s possible that a user could enter in a past date as the publish date. A condition is not needed in the second branch because it knows that if the condition in the first branch is not met, then otherwise do this.
Subscribe to:
Posts (Atom)